Labels

Showing posts with label Microsoft Dynamics Portals. Show all posts

JavaScript in OData portals

We have done odata services in CRM Portals to achieve through java script.


Step 1: Enable the portal entity list(Contact,Account,etc)
Go to Portal > Entity List. Create a new Entity List for Case Entity.

Step2: Enable Odata feed with entity type and views also in entity list


Step3: Now, To retrieve the data, Hit the URL in browser.
URL : Portal_URL/_odata  
      URL : Portal_URL/_odata/Entity_Set_Name : To retrieve the data
Here we can see the <atom:title type=”text”>Cases</atom:title>
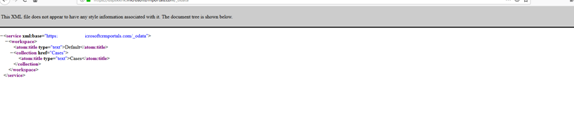
Step4: Upload your JavaScript in your respective “entity form”.
Below script :
if (window.jQuery) {
   (function ($) {
      $(document).ready(function () {
         if (typeof (Page_Validators) == 'undefined') return;
         // Create new validator
         var newValidator = document.createElement('span');
         newValidator.style.display = "none";
         newValidator.id = "titleValidator";
         newValidator.controltovalidate = "title";
         newValidator.errormessage = "<a href='#title_label'>This Case has been already generated.</a>";
         newValidator.validationGroup = ""; // Set this if you have set ValidationGroup on the form
         newValidator.initialvalue = "";
         newValidator.evaluationfunction = function () {
       var count =   GetCase();
               if (count > 0 )
              return false;   // Return false mean apply validation.
             else
              return true;   // Return true mean successful.        
         };
         // Add the new validator to the page validators array:
         Page_Validators.push(newValidator);
         // Wire-up the click event handler of the validation summary link
         $("a[href='#title_label']").on("click", function () { scrollToAndFocus('title_label','title'); });
      });
   }(window.jQuery));
}
function GetCase(){
  var count = 0;
  var title=$("#title").val();
$.ajax({
    type: "GET",
    contentType: "application/json; charset=utf-8",
    datatype: "json",
    url: "~/_odata/Cases?$filter=title eq '"+title+"'",
    beforeSend: function(XMLHttpRequest) {
        XMLHttpRequest.setRequestHeader("Accept", "application/json");
    },
    async: false,
    success: function(data, textStatus, xhr) {
     count = data.value.length;       
    },
    error: function(xhr, textStatus, errorThrown) {
        Xrm.Utility.alertDialog(textStatus + " " + errorThrown);
    }
});
return count;
}


Step5: If duplicate case is created then it will show you like “This Case has been already generated.” Please refer to below screenshot.


Remove New Registration Process completely from Microsoft CRM Portal


Microsoft CRM Portal allows organizatioon to set up their portal with minimal steps.


When we install the Portal Add-on, the registration process will be enabled by default. The Users can see the 'Registration' page when they click on 'Sign-In ' as shown in below screenshot.

Steps to remove the Registration Process in Microsoft CRM Portal:

Step1: To eliminate the registration process, we can use ‘Authentication/Registration/Enabled’ site setting.
   
  Goto Portals-> Site setting.

Step2: First, we have to create a Site Setting entity record with Name ‘Authentication/Registration/Enabled’ and set the value to false. This setting will completely remove the Registration process from the Portal.


Step3: As seen in the above screenshot, the Register and Redeem Invitation tab has disappeared. 
This setting will not allow users to browse the Register Page URL and the https://<PortalURL>/Account/Login/Register URL is not accessible.

https://<PortalURL>/Register is not accessible.

Restrict portal access by IP address


We want to restrict CRM Portals to run on specific IP Address. So, we can restrict the IP Addresses to open the CRM Portals. We have an in-built  feature available in CRM Portals. Here today i will be taking you through some steps to follow how to restrict the User IP Address to run CRM Portals.


Step1: Goto  Admin Page -> PORTALS

                                    
                              Click on "Manage"

Step2:  It will open the Portal Page.
                        
                           
                     Click on "Set up IP address restriction".

Step3: After clicking on "IP Address restriction". It will open to IP Address.


Click on "+" to add new IP address

Step4:  After adding the IP Address.
                    

To add Dynamic Charts in CRM Portals

View charts CRM PORTALS

We have approached to get dynamic Charts In CRM Portals through this code. Get The Chart Id and add below code snippet in Portals scripts(To display chart in specific page). 
Refresh the portal page.

Our Code snippet is:

{% chart id:"EE3C733D-5693-DE11-97D4-00155DA3B01E" viewid:"00000000-0000-0000-00AA-000010001006" %}